Are you a motorcycle owner? Being knowledgeable of the key parts along with the basic maintenance process is highly imperative. And one of the most important things that you should know is the battery replacement and installation.
With the help of our guide, you get to learn more about how to install a motorcycle battery. But before we get into the steps in replacing the battery of your vehicle, let’s first uncover the reasons for battery replacement.
Why you should replace your battery?
From corroded battery terminals to sulfate crystal accumulation, there are lots of factors that affect the performance of your motor battery. And if the battery is already showing signs of damage, the best way to remedy this problem is to replace the battery as soon as possible.
Another definite sign of battery replacement includes the leaking of acid from the internal plates. Or if your vehicle is taking too long to start, then it could also be an indication of a battery issue. Other hints include dimming headlights, receding horn volume, and inconsistent voltmeter readings.
And of course, old battery age brings out a series of complications within the system. It should be noted that batteries do not last for a lifetime. In general, batteries are replaced after 3 to 5 years. After this time duration, signs of wear and common problems arise like damaged parts or worst, dead battery.
So, if you come across these problems, it’s high time to get a replacement battery. This is a preventive measure to maximize the life of the vehicle. Installing the battery, however, may not be an easy task. But fret not because it’s quite straightforward. Just make sure you understand the nuts and bolts of the motor.
How to install a motorcycle battery?
As a motorcycle owner, it’s very useful to equip yourself with basic maintenance skills. This way, you can resolve simple issues with the electrical components of your motorcycle. And to save money and time, it’s also recommended that you are able to install a battery on your own.
So, we’ve gathered everything that you need to comprehend about battery replacement. This encompasses the things that you need as well as the steps to follow to make the process more efficient. Continue reading as we unravel the steps of DIY motorcycle battery installation with your bare hands.
Step1. Take a look at the manual.
The first step would be to get your manual and read it! This is definitely the most important piece that you should capitalize on, especially about installations, repairs, and other key information about your vehicle. Often than not, a factory service manual is provided by the manufacturer.
So, browse through this material and check the following―the type of battery and the location of the battery. In most cases, the batteries are located under the seat. However, each motor manufacturer comes with different motorcycle models, which means the positioning of the battery varies accordingly.
Step2. Prepare the tools in advance.
To kick off the installation process, you need to have the right set of tools. A standard toolkit should include a flathead screwdriver and a socket wrench. Some motorcycle batteries need a key to be opened, so an Allen key set is recommended as well. This gives you a variety of hex keys that fit your bolt size.
If you’re unsure of the tools that you need, this is the reason reading the manual is pivotal. This gives you an idea of the right equipment that you should prepare beforehand. But don’t worry because installing a new battery is not as stressful as it seems as long as you have the standard tools mentioned.
Step3. Turn off the engine.
Before you get started, you need to switch off the engine. This is a necessary step that should not be disregarded. Working on some alternations with a turned-on engine is such a risky move that may cause accidents. So, make sure you follow this course of action accordingly.
Step4. Remove the battery.
Once you have determined the location of the battery, you may now begin with the removal process. Some models come with a side cover, seat cover, and even a fuel tank before you can open the battery. There are also brands with battery cases, so you may need to get rid of these materials first.
In doing so, use the tools from your kit to remove these items. Make sure to keep the nuts and screws secured so you won’t have a hard time attaching them back, although the new battery often comes with free bolts.
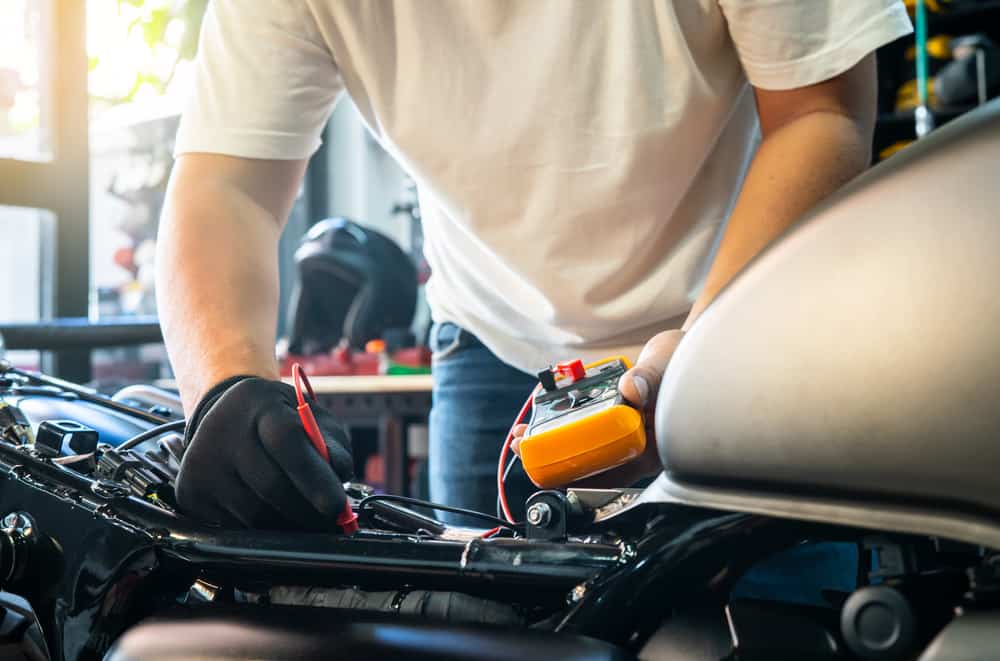
And if the battery area is wrapped with safety straps, carefully pull the strap out for you to see the cables. Using a wrench, disconnect the negative cable (black) from the negative terminal and the positive cable (red) from the positive terminal.
Removing the negative terminals first is critical to avoid instigating damage to the vehicle. It’s also the most advisable way to prevent short circuits and accidental overloading of ground cable.
Step5. Assess the old battery.
There are times when the old battery is actually still in good health and does not need replacement. In this case, the problem lies in other components. If you’re uncertain about the status of your battery, you may refer your concern to a local shop and consult a motor gear expert.
Through this, they can assist you with more complex decisions―whether to use the old one or purchase a new battery. You can also get insights from them on how to properly maintain your vehicle.
6. Place the new battery.
If the experts have advised battery replacement, then you may then begin with the installation. Attach the screws back in place with the new battery. When choosing the new battery, you should take into account the battery model.
This is one of the main reasons why you need to read the manual to know the correct battery for your motorcycle. If the primary battery model for your vehicle is unavailable, you may contact the retailer to get recommendations.
In addition, you should be thorough with the buying process. Skip the cheap yet substandard battery and go for top-of-the-line components for your vehicle. This could be pricier but it’s the most practical option, money-wise.
Step7. Reconnect all the cables.
Following a reverse order, reconnect the battery cables, starting with the positive side or the red wire. Then, attach the negative side to its corresponding battery terminal, followed by other screws. If you use the right battery, installing the new battery would be as easy as 123.
Another important thing to consider is the location when installing the new battery. You need to do this in a place where there is good ventilation. It’s because batteries may produce hydrogen gas due to chemical changes and reactions, which are flammable and potentially dangerous.
In addition, keep the battery away from acid and other potential triggers. If possible, you should have baking soda and soapy water right within your reach to neutralize harmful acids.

Step8. Turn on the engine.
Before you re-attach all other components like the seat covers and safety straps, you should check if the new battery will work seamlessly―with no glitches or sparks, whatsoever. Switch on the engine and see if the lights will turn on. If the lights are okay, it’s a clear indication that the battery is good.
On the other hand, if the engine or the lights do not work as planned, then there could be underlying issues with the battery. It could also be an indication of other problems with key motor components.
Step9. Put the panels and seats back in their position.
If you are sure that the battery is well placed, you may now attach all the remaining parts. Be sure to screw back all the bolts and other key components that were removed earlier. If you installed a battery that is different from the factory design, then there might be certain adjustments to be done.
For instance, if the battery replaced is smaller in a dimension like a lithium battery, you need extra materials such as rubber and foam spacers. These elements ensure that the battery is well-positioned. It also ensures that it would stay in place and limits the creation of cracks or leaks in the battery compartment.
Step10. Keep an eye on the motorcycle’s performance.
Since this is a new battery, it’s crucial that you monitor the performance of your motorcycle. There could still be minimal adjustments along the way. So, keep a close eye on how your vehicle works and check if there are some variances that needed to be acknowledged.
And if you think there are major changes in the workings of the vehicle, check it as soon as possible. Don’t hesitate to refer your concerns to a professional mechanic for in-depth assistance. They can give you a better grasp of the situation and help you with the problem at hand.
Conclusion
Installing a fresh battery is a simple process as long as you understand the basics. However, the steps vary accordingly, depending on the motorcycle or bike model. Therefore, you need to take into account the core information of your vehicle as well as the standard procedures.