
Solar systems and batteries have an interdependent relationship. The former is typically useless without the latter and vice versa. Let us explain how.
Off-grid solar power systems only provide electricity when the sun is up. At night or on cloudy days, this system becomes incapable of powering any appliance. However, people are still able to make it through by using a battery to connect the solar panels to the grid system.
Alternatively, a battery may depend on the electricity supplied by solar panels for charging. In both cases, one thing is crucial to know – what size solar panel to charge a 12V battery?
We have specifically quoted a 12V battery because the majority of people use it. But don’t worry. In today’s post, we will dive deep into the topic and answer all the related queries in detail. Read more!
Table of Contents
Why Choose Solar Panels to Charge Batteries?
Solar power panels rely on the sun’s energy to convert photovoltaic energy into useful electricity. These systems are renewable and inexhaustible because the sun rises up every morning to offer all heat energy.
As a result, there’s no harm inflicted on the current environment. The valuable and limited energy resources are also preserved for future generations. Hence, the solar energy system is environment-friendly and sustainable.
Using it to restore a battery’s healthy state of charge is an act of greener living. It’s your contribution to making the world a better place.
Plus, solar panels help reduce the dependency on the main grid system. Most of your electricity comes from the sun, which is free and available to everyone. This lowers the electricity bills and saves you bulks of money.
Factors to Consider When Selecting Solar Panel Size for Battery
Solar panels come in three main sizes; 36-cell, 60-cell, 72-cell, and 96-cell. Usually, 60-cell and 72-cell solar panels are used for residential purposes. However, when talking about batteries, you cannot just determine the solar panel size by looking at the voltage.
There are several other factors about solar batteries that need to be considered. Let’s discuss each one below!
1. Voltage
Voltage refers to the difference in pressure that pushes the electric current through the wires. A 12V battery is relatively strong and can generate up to 600-Amps.
To make sure it’s fully charged, you will need a solar panel size that can provide around 12.6V to 13.6V. This will help bring the battery to a healthy charge state.
2. Wattage
Wattage is the measurement of the power used at a given time. A higher wattage rating of the solar panels means a higher charging speed.
So, while a 50W solar panel can recharge a 20Ah 12-volt battery in 8 hours, a 20W solar panel will do it in 17 hours. That said, make sure the battery can handle the wattage output of the solar panels. Too much wattage can overcharge the batteries, and even damage them permanently.
A standard 36-cells solar panel can produce a maximum of 100-watt. 36-cell panels with high efficiency can offer up to 180W. You can also go for 60-cells solar panels (370W) for large batteries.
3. Amp Hours
Amp hours are an important consideration only when you’re selecting the battery for solar panel sizes. By this, we mean that your goal is to provide a backup supply to the solar power system instead of using the system to charge the batteries.
Amp hours tell the number of amps a battery can offer in 1-hour. So, if you’ve got a 12V battery with a 100Ah rating, it means the battery can offer 100 amperes of current in 1 hour.
Let’s suppose the current inflow is 5 amps; your battery will run for 20 hours at maximum. If the current is increased to 20 amps, the same battery will run for an estimated 5 hours.
It’s important to know the Ah of the battery so that you can do the calculation of the solar panel accordingly. Here’s the formula to find the battery Ah:
- Multiply by the battery volt. This will give you Watts per Hour.
- Divide the obtained answer by the number of hours you intend to use the solar panels.
Worked Example for 100Ah 12V battery:
100Ah x 12V= 1200 WH (watt-hours)
1200WH x 8H= 150W
You need a 150W solar panel for a 100ah 12V battery. Similarly, you can work out the ideal size of a solar panel for different 12V batteries.
So, What Size Solar Panel Do You Need to Charge a 12V Battery?
There are different sizes of solar panels, and almost any of them can work for a 12V battery. It mainly depends on whether the particular size in question can match the voltage, wattage, and amp-hours requirement of the battery.
Typically, people choose the 36-cells solar panel size. It has an 18V output and can support up to 180W. That said, you need to calculate everything according to your battery capacity.
If you’ve multiple batteries in series or parallel, then be extra careful. You’ll have to calculate the total requirements to select the best solar panel size.
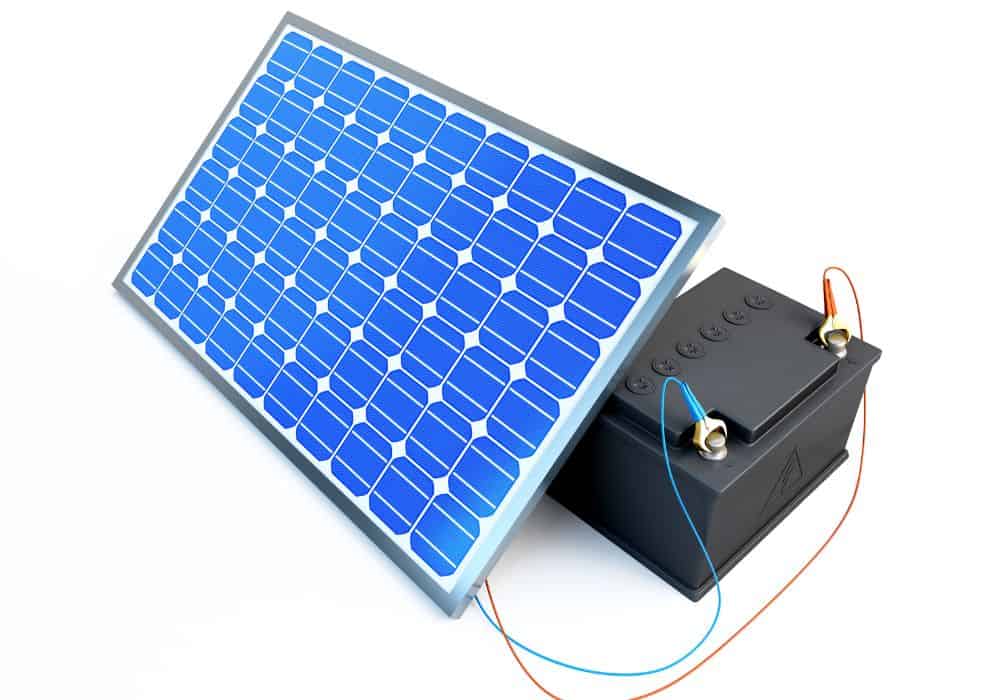
How to Charge a 12V Battery with Solar Panels?

Directly charging a 12V battery from solar panels is not possible. There are no compatible ports and outlets in the panels to establish a connection with the battery. Even if there was, doing so is a dangerous option.
The sun’s energy is not consistent. Sometimes it’s high, and sometimes it’s low. And so, a direct connection poses the risk of overcharging and explosions.
It’s why having a solar charge controller is necessary. This device converts the voltage received from solar panels into a suitable one for the battery. Once fully charged, the controller will automatically cut off the energy supply to protect the battery.
Here’s a step-by-step guide on how to charge a 12V battery using solar panels:
PART I: Purchase the Right Charge Controller
- First, find what amp rating is required for your specific battery. You can do this by dividing the battery voltage by the wattage. This will give you the required amps. Round off this number to the next highest figure. For example, if your answer was 25 amps, you will need a charge controller of 30 amps.
- Now, choose the type of charge controller. There are two main types that include:
- Maximum Power Point Tracking (MPPT)
- Pulse Width Modulation (PWM)
Typically, MPPT charge controllers are more efficient than PWM ones. They will give you 30% more energy to store and transfer. However, they’re also expensive.
If you don’t have the budget at the moment, you can choose a PWM model for a start and later switch to an MPPT controller.
PART II: Install the Charge Controller
- Identify a safe and dry place to install the controller. Remember, you cannot place the controller outside with the solar setup because they aren’t weatherproof. Even if you have a portable solar panel, go for a protected spot.
Pro Tip: Install the charger controller on a non-metallic surface. It’s best if the device has direct contact with the ground. This helps manage accidents where the charge overloads.
- Check whether your 12V battery has wires. If not, you’ll have to buy 10- or 16-gauge wires and connect them.
- Make sure to link the positive cord with the position terminal and vice versa. Also, use a red and black cord to differentiate between the wires.
- Now, insert the bare wire ends into the charge controller ports. Tighten them in place using a screwdriver. If you find this inconvenient, attach connectors to the wire ends and push them into their respective ports.
- After this, you will have to connect solar input cables to the charge controllers (from the solar panel). Since the majority of solar panels have MC4 connectors, use them to link wires between the solar panel and the charge controller.
Pro Tip: MC4 connectors have a male and female side. Ensure that you’ve connected a male-to-female connector and vice versa. Push the connectors until you hear a click sound, which confirms a secure connection.
PART III: Check the Connection is Successful
- Once all the wires are connected, turn on the power system and the battery.
- Monitor the digital screen of the charge controller to ensure it is giving readings. If there’s a blank screen or zero, it means something is not connected properly. Go through the links again.
- If you’ve bought an advanced MPPT solar charger, chances are that the device will have a dedicated app. Use it to keep a check on the voltage output from your mobile.
Finally, everything is set up, and you can leave the battery to charge. The exact time required for charging will depend on the battery specifications and panel size. That said, the charge controller will keep you informed about the charge time.
When the battery is near full, the voltage output will start to drop on the controller. Once it’s completely stable or at zero, the battery is fully charged and ready for removal.
Last Words
The best solar panel size for a 12V battery can be anything. It all depends on the voltage, wattage, and ampere hour of your specific battery. So, be very careful when making a decision.
We hope this article has helped resolve all the queries. If there’s still any point of confusion, do let us know in the comments below!